Planning is the key to a successful project. Measure the area more than once.
Remember to consider the thickness of lumber and drywall. Use painter’s tape temporarily, stick to walls, floor, and ceiling to help visualize and lay out the closet depth, width, door positions. This would be the time to adjust if needed.

Eliminate existing tile, ground surface, or floor covering from the area. Mark out the place of the base, then the sides, and afterward the top. Take extraordinary consideration. Any blunders here will become amplified as development advances. Recheck each measurement to assure accuracy.
Using a miter saw or handsaw, cut 2x4s to length for the top and bottom wall plates (the horizontal load-bearing framing). If the closet is being built into a small nook, a full-length floor plate (a board that lies flat on the floor and supports the framing) may not be required. On longer closets, doors usually mean that sections of the bottom plate need to be removed. This is best done after the main structure is assembled and rigid.
Screw the base plate to the floor. Mark where the doors go, and put screws on one or the other side, however not through the piece of the plate that should be taken out for the door opening. If conceivable, screw the top plate to roof joists (utilize a stud locater to find them). On the off chance that this is unimaginable, empty wall anchors should be utilized. Screws into drywall alone will not connect strongly. Empty drywall anchors open up behind the drywall, spreading the load across the surface and giving the essential holding power.
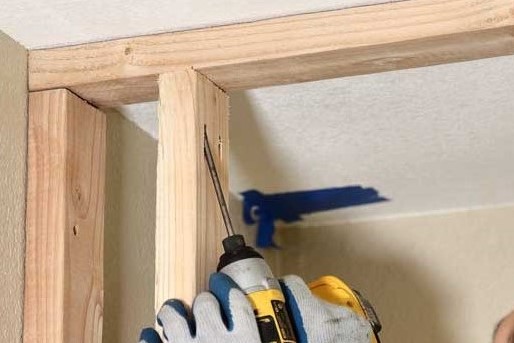
Cut full-level studs for the end walls, and either screw to joists or use drywall anchors. For corner pieces or focal dividers, screw together two 2x4s with scrap blocks between them to give a more extensive stud. Toe-screw (importance to drive a nail at an around 45-degree point) from the two sides close to the finishes into the floor and top plates. Fit extra studs depending on the situation either to help doorframes or drywall. Studs ought to be something like 16 inches apart
Measure the level expected for the doors and cut trimmers to fit the upright studs. These will uphold the finishes of the headers, which are the even lengths of wood over the doors. Cut the doors headers to sit, and screw set up. Support pieces called “cripples” or “cripple studs” can now be cut to fit between the top plate and doors header. Space them 16 inches apart and toe-screw into place.
When the frame is secure, utilize a handsaw to cut through the base plates where the doors will fit, and eliminate this material.
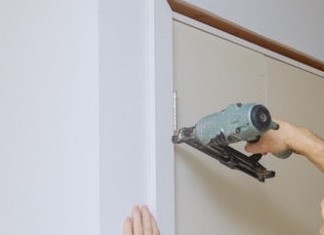
When the frame is set up, now is the right time to add the drywall. Certain individuals utilize a handsaw to cut drywall, and on the off chance that patterns are required it is a better method. Nonetheless, for straight lines there is a speedier and more exact strategy utilized by pros: Score a line through the back side with a utility knife, sufficiently enough to cut partially into the center. Snap the board, then cut through the paper on the front. Change the utility blades edges as often as possible to continue to accomplish a neat and tidy cut.
Screw drywall to the studs, setting screws around 12 inches apart and sinking them just beneath the surface. Begin with the closet divider if fitted, do the outside. If the closet does not fill the wall completely, you will have an external corner that should be built up with a corner bead, which should be taped and finishes.
There are three types of closet doors: standard, bifold, and sliding. Each needs various considerations while fitting, which is the reason we suggest picking the ones you like in the arranging stage.
Sliding doors are the simplest to fit. Many just require runners at the top that the doors swing from. In any case, when open they occupy a lot of space, so they do not function well in small closets. Bifold doors are a popular option and frequently work on a comparable guideline. Most accompany with complete directions.
Standard single or door pairs can be testing, especially fitting hinges. Reasonable sizes can be hard to track down, so prehung doors are more straightforward. The hinges are now fitted so the doorframe simply should be fixed to the opening. Changes are made utilizing shims, which are then disguised by trim fitted around the doorframe.
Those with the suitable DIY abilities might wish to make their own closet organizers to fit inside the closet, however storage extras like this highly evaluated Rubbermaid Kit available at Amazon are reasonable and flexible.
While mounting closet rods or shelving frameworks, similar standards apply while fitting studs. Assuming you know where existing studs are behind the drywall, you can screw into them. If you do not, hollow drywall anchors ought to be utilized. When coats, shoes, and different things have been added, the capacity framework can be carrying extensive weight. If it is not safely secured to the wall, the entire thing could pull away.

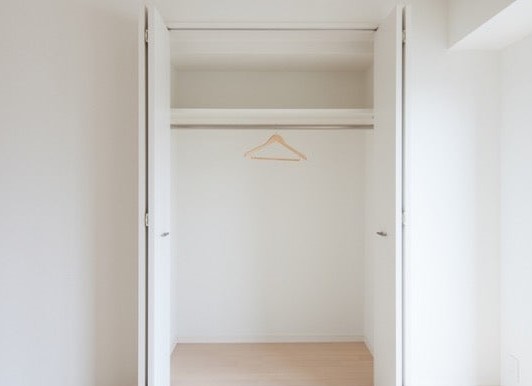
The means above give an attempted and tried technique for adding a closet to various spaces. The standards continue as before for an assortment of closet sizes; every custom closet is only a question of scale.
We can be at real fault for setting unrealistic deadlines, and missteps happen when we hurry to finish the job. So, give yourself a lot of time to achieve the undertaking. Not exclusively will the outcome fulfill your storage needs, yet it will likewise provide you with an incredible pride.